Optimizing Your Home Environment for Post-Surgery Recovery
This guide is for patients and caregivers getting ready for post-surgery home recovery—especially if you’re worried about pain, stairs, sleep, meds, infection risk, or just how to set up a healing environment that actually helps. You might be frustrated by conflicting recovery tips, nervous about falls, or unsure what to buy (and what’s a waste of money). If you want a smoother, safer recovery with less guesswork, our care team can map it out, prep your home, and stay on-call so you can focus on healing—not logistics.
What should I prepare at home before surgery?
Short answer: create clear pathways, set up one “recovery zone,” gather key supplies, and plan food/transport ahead of time. Do this 5–7 days before surgery so you’re not scrambling.
- Clear walkways to 36 inches wide—no cords, loose rugs, or wobble stools.
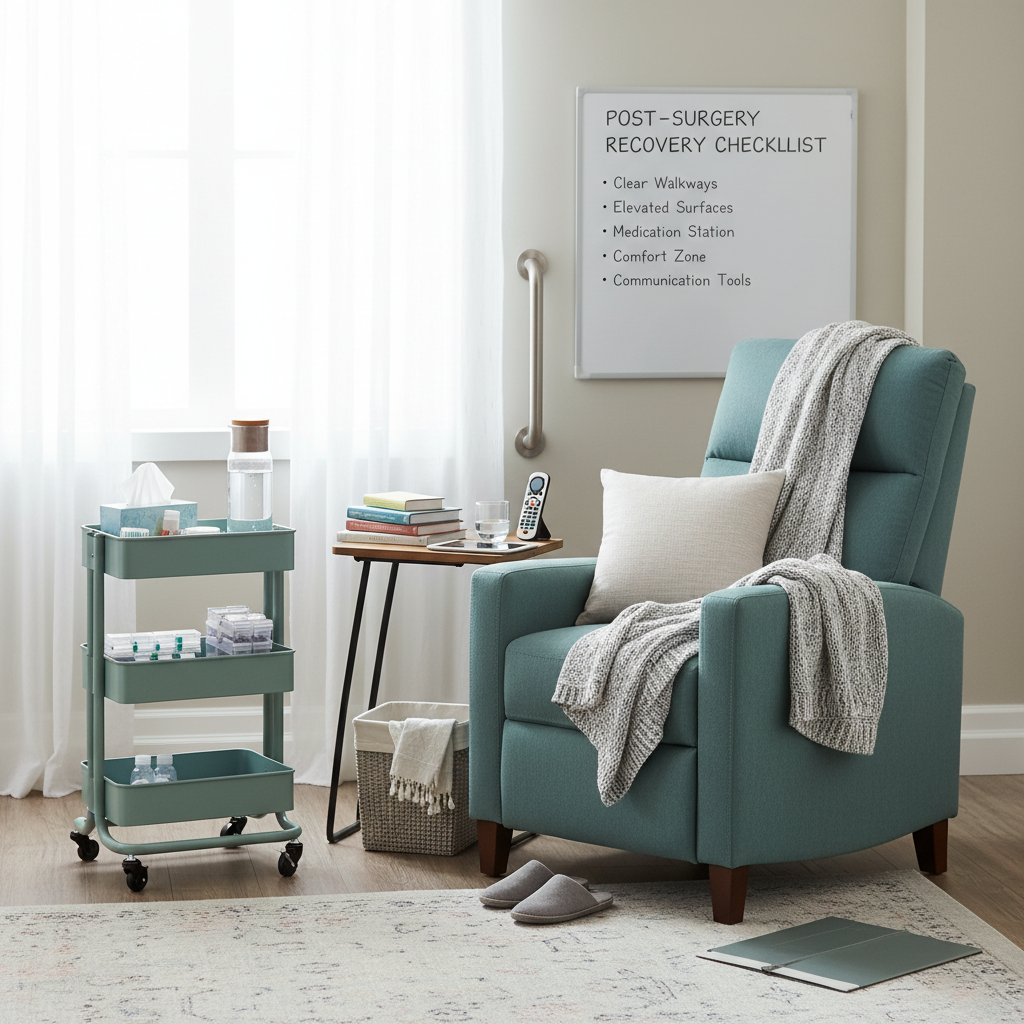
- Designate one recovery zone (bedroom or recliner) with a flat surface, good light, outlet, and a reachable bin for meds, water, and phone.
- Install night lights from bed to bathroom (motion-sensor lights help at 2 a.m.).
- Set up a raised toilet seat or grab bars if you’ve had hip, knee, or abdominal surgery.
- Arrange transport for discharge and the first 2 follow-ups—don’t assume rideshares will be available right at 7:00 a.m.
- Pre-cook 10–12 high-protein meals you can heat in 5 minutes. Label dates. Learn more about high-protein meals.
- Stock simple hydration: 8–12 bottles of electrolyte water, ginger tea, and broth.
- Line up help for the first 72 hours—someone to stay or at least check in twice daily.
From what I’ve seen, doing just those steps cuts the “first week chaos” by a lot. Learn more about first week chaos. Like, dramatically.
How do I create a healing environment that speeds recovery?
Think calm, clean, and predictable—your body heals faster when stress, noise, and friction are low.
- Light: daylight in the morning, warm lamp light at night. Aim for 30 minutes of sunlight by a window daily to support sleep and mood.
- Sound: white-noise or a fan to buffer street sounds. Quiet reduces cortisol—your body’s not trying to heal while “on guard.”
- Temperature: keep between 68–72°F. If it’s a heat wave, a simple box fan plus a bowl of ice near the airflow works surprisingly well.
- Air quality: open windows 10 minutes twice a day or use a HEPA purifier near the recovery zone.
- Clutter: one basket per category (meds, wound care, tech, comfort). No rummaging.
I’d argue the environment matters as much as the meds. It’s the difference between trying to heal on a busy freeway versus a quiet side street.
What supplies do I actually need for home recovery?
You don’t need a full hospital room. You need smart basics you’ll use daily.
- 12–16 oz water bottle with straw (easier to sip while reclined)
- Over-bed or couch-side table
- 7-day pill organizer + phone alarms every 4 hours for the first 48 hours
- Digital thermometer, blood pressure cuff if advised, and a small notepad for symptoms
- Non-stick sterile pads, paper tape, saline, and hand sanitizer near your seat
- 12–18 inch grabber/reacher tool and long-handled shoehorn
- Shower chair and non-slip bath mat (a $25 mat prevents $10,000 worth of problems…)
- Loose clothing that opens in front (8–10 pieces so you’re not doing laundry daily)
- Frozen gel packs (2–3) and a thin towel barrier for icing
- Portable phone charger + long 6–10 foot cable
Optional but helpful: a smart speaker for hands-free timers and calls, and a small bell (yes, old-school) to get a caregiver’s attention from the next room.
How do I manage pain, meds, and sleep at home?
Here’s the truth: consistency beats heroics. Don’t white-knuckle through pain and then chase it.
- Follow the written pain plan from your surgeon exactly—set alarms. If it says every 6 hours, don’t wait 9.
- Layer options: scheduled acetaminophen, prescribed meds if needed, plus icing 10–15 minutes at a time (protect skin).
- Hydrate: target 2 liters of fluids per day unless your doctor says otherwise.
- Sleep smart: elevate what needs elevating (knee, ankle, or upper body after some abdominal procedures) with 2–3 pillows or a wedge. No giant pillow stacks that slip.
- Naps are fine. Just keep them under 60 minutes so you still sleep at night.
- Use a wind-down “ritual” at the same time nightly—dim lights, light snack, then meds, then bathroom, then bed. Same order, every night.
I’ve noticed people sleep better if they remove “micro-friction.” Example: place tissues, water, lip balm, and the TV remote within 12 inches of your dominant hand. Tiny detail, huge payoff.
How do I move around safely and avoid falls?
Falls are the enemy of home recovery. Prevent them like your life depends on it—because sometimes it does.
- Use the “rule of 2”: first 2 days, every movement is assisted or supervised.
- Stand up slow: sit, count to 5, then stand while holding a stable surface.
- Footwear: grippy socks or closed-back slippers. No flip-flops.
- Stairs: up with the good, down with the bad (hold rail). If you had lower extremity surgery, ask your therapist for exact technique.
- Keep a chair near the shower entrance and another near the kitchen if you get lightheaded.
- Night plan: bathroom path lit, clear, and rehearsed—yes, literally walk it once before bed.
So here’s the thing about mobility aids—use them even if you “feel fine.” Overconfidence causes more mishaps than weakness.
What should I eat and drink to heal faster?
Simple, protein-forward, and gentle on the gut. You’re aiming for wound healing and steady energy, not a gourmet marathon.
- Protein: 80–100 grams daily for most adults unless contraindicated. Think Greek yogurt, eggs, rotisserie chicken, tofu, lentils.
- Fiber: 25–30 grams to prevent constipation from pain meds—berries, oatmeal, kiwi, chia.
- Fluids: 8–10 cups. Clear broths, water with a splash of juice, herbal teas (ginger helps nausea).
- Micronutrients: vitamin C (citrus, bell peppers) and zinc (pumpkin seeds) support healing.
- Small meals: 5–6 snack-sized plates are easier post-anesthesia.
If it’s flu and RSV season (hello, November through February), keep meals simple to limit grocery runs. And mask around sick friends—social love is great, shared viruses, not so much.
How do I keep wounds clean and lower infection risk?
Follow your surgeon’s wound-care instructions to the letter. If you didn’t get any, call and ask for the written protocol—don’t guess.
- Hand hygiene before any dressing change. Every time.
- Keep pets off the bed while the incision is fresh. I know, they’re cute—still no.
- No lotions or powders anywhere near the incision unless prescribed.
- Change dressings as directed; bag and toss used materials immediately.
- Shower timing only as approved; pat dry (don’t rub).
Redness spreading, fever 100.4°F or higher, or drainage with odor are not “wait and watch” signs—call your surgeon.
What can caregivers do that helps the most?
Caregivers don’t need medical degrees—they need a rhythm.
- Twice-daily check-ins at predictable times (9 a.m. and 6 p.m.).
- Run the medication checklist out loud and confirm the next dose time.
- Prep water and a protein snack within reach before you leave the room.
- Walk together 3–5 short laps daily if allowed—movement prevents clots and stiffness.
- Keep notes: pain levels, bowel movements, sleep, and questions for the next appointment.
Look, if all this coordination sounds like a second job, that’s because it can be. If this feels overwhelming, our team can handle setup, supply kits, and ongoing check-ins so you don’t have to juggle it all.
How do I prepare my home if I live alone?
You can absolutely do safe home recovery solo with planning.
- Schedule 2 brief daily virtual check-ins (FaceTime/Zoom) with a friend or our nurse line for the first 5 days.
- Place a cooler with ice packs and 3 easy meals by your seat each morning.
- Keep a spare key in a lockbox so helpers can enter if needed.
- Use a rolling cart to move items room to room without multiple trips.
- Set an hourly “stand and stretch” reminder during daytime—circulation matters.
In my experience, the lockbox plus video check-ins solves 80% of the “what if something happens?” anxiety.
What do I do the first 48 hours after surgery?
The first 48 hours are about stability, hydration, and preventing complications. Not heroics or housework.
- Follow the medication schedule exactly. Alarms on. No skipping food before meds if directed.
- Hydrate steadily—6–8 cups by bedtime day one.
- Short, frequent walks if cleared: 5 minutes, 5 times on day one; 10 minutes, 3 times on day two.
- Ice and elevate as instructed, then rest. Repeat.
- Check the incision once per day under good light. No “poking” or extra handling.
The best part is—well, actually there are two best parts—if you nail days 1 and 2, days 3–7 usually feel way smoother, and you build confidence fast.
What are red flags that mean call the surgeon now?
Don’t wait if you notice any of the following. Why? Because early action prevents bigger issues.
- Chest pain, trouble breathing, or calf pain/swelling
- Fever 100.4°F or higher, chills, or shaking
- Rapidly spreading redness, warmth, or pus at the incision
- Uncontrolled pain despite taking meds as directed
- Persistent vomiting or inability to keep fluids down for 12 hours
- Confusion, severe dizziness, or fainting
If you’re unsure, call. It’s always the right move to ask.
Room-by-room setup ideas that just work
Bedroom
Bed height should let your feet plant flat. Keep a lamp, meds, water, and phone within 12 inches. Extra pillow between knees can protect hips and backs.
Bathroom
Non-slip mat, shower chair, handheld showerhead if possible. Towel and clean clothes staged before you step in. Door unlocked for safety.
Kitchen
Move essentials to waist height—no reaching high or bending low. Pre-portion snacks into single-serve containers.
Living area
Recliner or supportive chair with arms. A small caddy with remotes, charger, tissues, notebook, and pen so you’re not hunting for stuff.
Seasonal and current considerations
If you’re recovering during fall/winter, it’s flu/RSV season—mask around crowds, wave off sick visitors (politely ruthless), and keep hand sanitizer at the door. Summer heat? Cool the room to 70°F if you can, hydrate with electrolytes, and ice after walks. Storm season or outages expected? Charge devices to 100% and keep a battery pack ready the day before surgery.
48-hour home recovery setup checklist
- Pathways cleared and lit (hallway night lights on)
- Recovery zone stocked: water, meds, wound kit, phone charger, snacks
- Bathroom safe: mat, chair, within-reach toiletries
- Meals ready: 6–8 portions visible at eye level in the fridge
- Transport confirmed with backup contact
- Medication schedule printed and alarms set
- Emergency contacts posted on the fridge (surgeon, pharmacy, caregiver)
- Lockbox/key plan set, if alone
If you want a done-for-you version, our team assembles everything into one labeled kit and installs safety gear in under 90 minutes—so you walk back into a home that’s already dialed in.
FAQ: quick answers to common home recovery questions
How soon should I start walking after surgery?
If your surgeon cleared it, within 24 hours—just short, supervised trips at first. Movement prevents clots and stiffness.
Can I shower?
Only when your surgeon says it’s okay. Use a shower chair, keep water off the incision if instructed, and pat dry.
How do I sleep comfortably?
Use a wedge or 2–3 pillows to support the surgical area and keep everything aligned. Trial the setup before surgery night if you can.
What about stairs?
Limit trips early. If you must use stairs, go slow with rails and a spotter. Up with the good leg, down with the recovering leg.
What if I forget a dose?
Call your care team for guidance before doubling. This is why alarms and a pill organizer matter—simple tools, fewer mistakes.
Honestly, home recovery doesn’t need to be a maze. With a calm space, a predictable routine, and the right supplies, you’ll heal faster and worry less. If you want support—from one-time home prep to full post-surgery check-ins—our specialists can help you hit the ground running and keep you there, day by day, until you’re back to yourself.